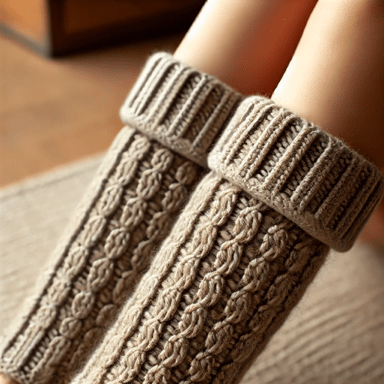
A Stylish DIY Guide
As the temperatures drop, cozy accessories become essential, and nothing says winter chic like a pair of handmade crochet leg warmers. Whether you’re looking to stay warm or add a stylish touch to your outfit, crocheted leg warmers are an excellent project for beginners and seasoned crocheters alike. In this guide, we’ll walk you through everything you need to know to crochet your own custom leg warmers.
Why Crochet Leg Warmers?
Leg warmers are versatile and trendy. They’re perfect for layering over leggings, wearing with boots, or even for dance and yoga practice. By crocheting your own, you can choose the perfect yarn, customize the size, and even add embellishments to reflect your personal style.
Supplies You’ll Need
Before you start, gather these materials:
• Yarn: Choose a medium-weight or bulky yarn for a warm and stretchy finish. Acrylic or wool blends work well.
• Crochet Hook: Refer to the yarn label for the recommended hook size. Typically, a size 5.0mm (H-8) or 6.0mm (J-10) hook works well.
• Measuring Tape: To size the leg warmers.
• Scissors: For cutting yarn.
• Tapestry Needle: To weave in ends.
Step-by-Step Instructions
- Measure and Plan
• Measure around the widest part of your calf and the length from your ankle to just below your knee (or desired height).
• Note: Crochet stretches, so consider a slightly snug fit when determining the width. - Start with a Foundation Chain
• Create a foundation chain to match the desired width of your leg warmer (approximately the calf circumference).
• Make sure the number of chains is a multiple of your chosen stitch pattern (e.g., multiples of 2 for ribbing). - Join the Chain
• Slip stitch the last chain to the first chain, forming a loop. Ensure the chain isn’t twisted. - Work the Body of the Leg Warmer
• Use a simple stitch like half-double crochet (HDC) or double crochet (DC) for the main body:
• HDC: Yarn over, insert hook into the stitch, yarn over, pull through all three loops on the hook.
• DC: Yarn over, insert hook into the stitch, yarn over, pull through two loops, yarn over again, and pull through the remaining two loops.
• Work in rounds, continuing until the piece measures the desired length.
• For a snugger fit, alternate with a ribbing pattern like front post and back post double crochets (FPDC/BPDC). - Add Ribbing (Optional)
• Add ribbing to the top and bottom edges for a finished look:
• Work in FPDC and BPDC for a few rows to create a stretchy, textured band. - Finish and Weave in Ends
• Once you’re happy with the length, fasten off the yarn and weave in the ends using a tapestry needle.
• Try on the leg warmers and adjust if needed.
Tips for Success
• Choose the Right Yarn: Stretchy yarn ensures your leg warmers stay in place.
• Customize the Design: Add stripes, color changes, or embellishments like buttons or bows.
• Experiment with Stitch Patterns: Try shell stitches or bobbles for a unique texture.
Crocheted leg warmers make excellent gifts and can be customized for any season or occasion. Play with colors, yarn textures, and stitch combinations to create something truly unique. Whether you’re new to crochet or a seasoned expert, this project is quick, rewarding, and perfect for showing off your creative skills.
Happy crocheting!
